4 Ways To Insert PowerPoint Symbols
In this article you will find 4 Ways To Insert PowerPoint Symbols. Learn the easy way and the smart way to insert symbols!
Option #1 : The Usual Way
Whenever you create business presentations you may need to insert some special characters or symbols like ⁰, ©, α, Ω, β, ℗, ™, ℠ etc. that are not readily available of your keyboard. PowerPoint allows you to insert those symbols easily when you go to ‘Insert’ tab in PowerPoint ribbon and click on ‘Symbol’ button.
 Insert Symbol Tool
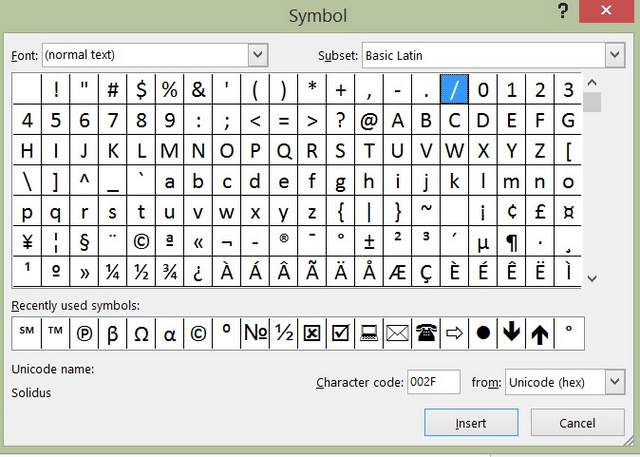
When you click on the button, the following dialog box opens up with a whole lot of symbols and special characters you can insert in your presentation:
 PowerPoint Symbol Options
When you click on ‘Insert’ button, the character gets inserted to the text box on your slide. This is the most commonly used method of inserting a symbol. There are more ways to do this.
Option #2: Easy Shortcut for Symbols
There are certain symbols that can be easily inserted by typing certain text. For example, you can insert © symbol by typing (c), ™ symbol by typing (tm), ® symbol by typing (r) etc.
Option #3: Alt Codes for Symbols
There are certain Alt codes that help you insert symbols. For example, you can insert a degree symbol by typing ‘0176’ in the numbers pad (you should have unlocked the Number keys) while keeping the ‘Alt’ button pressed. In case of laptop, keep the ‘Fn’ and ‘Alt’ keys pressed simultaneously while you type in the numbers.
If you like this way of inserting Symbols, you can find a comprehensive list of codes you can use in this website Alt Codes
The most interesting part is – you can create your own shortcuts to insert symbols in PowerPoint using Auto correct options…
Option #4: The Smart Way Using AutoCorrect
Here is how you set it up…
Put the symbol on your clip board:
Clip board is the short term memory of your computer. Whatever you copy gets to the clip board. When you press ‘paste’ the item gets pasted. To create a shortcut for a symbol let us first put the symbol to our clipboard.
Insert a text box on your slide. Go to Insert -> Symbol -> Choose the symbol for which you want to create shortcut. Let us say we want to create a shortcut for a currency symbol Yen – ¥. Click ‘Insert’ after choosing the symbol to insert it into your text box. Now select the symbol and press ‘Copy’ or ‘Ctrl+C’. Now, we have the symbol in the clip board of the computer.
Insert the symbol in Auto correct options:
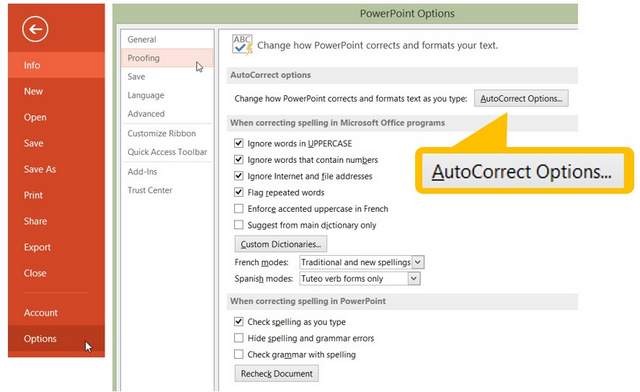
Go to File -> Options -> Proofing -> Autocorrect Options and click on the button.
 PowerPoint AutoCorrect Tool
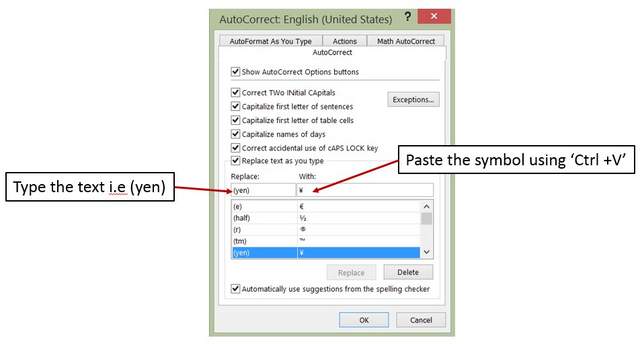
The following dialog box opens up:
 AutoCorrect Set Up
In the box under ‘Replace:’ type the shortcut text. In our case we want to use (yen) as the shortcut text. In the space under ‘With:’ insert the symbol using ‘Ctrl+V’ shortcut. Then, click ‘Add’ and press ‘OK’. The shortcut gets stored in the system. So, every time you type (yen) you will find PowerPoint replacing it with ‘¥’ symbol.
You can create a shortcut text for pretty much any symbol you use regularly and save tons of time.
What if you want to override Autocorrect options?
Sometimes you may need to include (C) as text to mean Captain or Capital. However, the moment you finish typing (C) PowerPoint converts it into ©. So, how do you override the auto correct option in such cases?
As soon as you see the conversion happen to © press the ‘undo’ button on your quick access toolbar or press ‘Ctrl + Z’. This will revert the text back to (C).
I hope you found this tutorial useful. You can find many more such PowerPoint tricks in our tutorials section.
Please do share your comments below if you found this tutorial useful.
Related Posts
Top of Page : Insert PowerPoint Symbol
Main PowerPoint Tutorials Page


